Muhammed IlliyasSept. 3, 2024
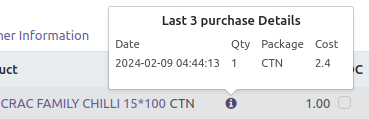
Unlock the potential of your data with the Odoo Info Button—an intuitive tool designed for quick and easy access to related records. Seamlessly integrated into the user interface, this feature empowers users to explore interconnected data with a single click. The Info Icon Button, functioning as a widget, enhances the user experience by providing a modular and reusable element. Uncover details, relationships, and crucial insights effortlessly, fostering a more informed decision-making process. Simplify your Odoo experience and navigate your records effortlessly with the user-friendly and accessible Odoo Info Button. Elevate your workflow and make data-driven decisions with confidence.
Example code given for retrive last three purchases
Create a JavaScript file to implement a widget for an info button.
/** @odoo-module **/
import { registry } from "@web/core/registry";
import { useService } from "@web/core/utils/hooks";
import { usePopover } from "@web/core/popover/popover_hook";
var rpc = require('web.rpc');
const { Component, EventBus, onWillRender } = owl;
export class LastPurchasePopover extends Component {
setup() {
this.actionService = useService("action");
}
}
LastPurchasePopover.template = "alh_last_three_purchase.LastPurchasePopOver";
export class InfoIconWidget extends Component {
setup() {
this.bus = new EventBus();
this.popover = usePopover();
this.closePopover = null;
var self=this
setTimeout(() => {
const collection = document.getElementsByClassName("p_id");
var sale_id;
if (collection){
if(collection[0]){
sale_id=collection[0].textContent
}
}
rpc.query({
model: 'purchase.order.line',
method: 'last_three_purchase_preview',
args: [this.props.record.data.id,this.props.record.data.product_id[0],sale_id]
}).then(function (data) {
self.props.record.data['last_three']=data
})
},400);
this.calcData = {};
}
showPopup(ev) {
this.closePopover = this.popover.add(
ev.currentTarget,
this.constructor.components.Popover,
{bus: this.bus, record: this.props.record, calcData: this.calcData},
{
position: 'top',
}
);
this.bus.addEventListener('close-popover', this.closePopover);
}
}
InfoIconWidget.components = { Popover: LastPurchasePopover };
InfoIconWidget.template = "alh_last_three_purchase.infoIcon";
registry.category("view_widgets").add("last_purchase_widget", InfoIconWidget);
The setTimeout function in the InfoIconWidget component serves a crucial purpose in ensuring the smooth execution of the code. Its delay of 400 milliseconds is strategically employed to accommodate the asynchronous nature of certain operations, particularly those related to DOM rendering.
Within the setTimeout block, a remote procedure call (RPC) is initiated using the web.rpc module. This RPC call is designed to communicate with the Odoo server, specifically querying the 'purchase.order.line' model and invoking the 'last_three_purchase_preview' method. The arguments for this method include data related to the current record, such as its ID, product ID, and potentially a sale ID derived from elements in the DOM.
By introducing the delay, the setTimeout function allows adequate time for the DOM to complete rendering, ensuring that relevant elements, like those with the class "p_id," are available for extraction. This cautious approach prevents potential issues arising from attempting to manipulate or retrieve data from the DOM before it is fully ready.
In summary, the combination of the setTimeout function and the subsequent RPC call demonstrates a thoughtful strategy to synchronize the execution of code with the rendering lifecycle of DOM elements, ensuring accurate and reliable interactions with the Odoo server.
Create a XML file to implement a widget for an info button.
<?xml version="1.0" encoding="UTF-8" ?>
<template id="template" xml:space="preserve">
<t t-name="alh_last_three_purchase.infoIcon" owl="1">
<a tabindex="0" t-on-click="showPopup" t-attf-class="fa fa-info-circle {{ calcData.forecasted_issue ? 'text-danger' : 'text-primary' }}"/>
</t>
<t t-name="alh_last_three_purchase.LastPurchasePopOver" owl="1">
<div style="padding:5px;">
<center><h6>Last 3 purchase Details</h6></center>
<table class="table table-borderless table-sm">
<tbody>
<table width="100%">
<t t-if="props.record.data.last_three">
<tr>
<td style="padding-right:10px;">Date</td>
<td style="padding-right:10px;">Qty</td>
<td style="padding-right:10px;">Package</td>
<td style="padding-right:10px;">Cost</td>
</tr>
<t t-foreach="props.record.data.last_three" t-as="ls" t-key="ls.index">
<tr>
<td style="padding-right:10px;"><t t-esc="ls.date"/></td>
<td style="padding-right:10px;"><t t-esc="ls.quantity"/></td>
<td style="padding-right:10px;"><t t-esc="ls.package"/></td>
<td style="padding-right:10px;"><t t-esc="ls.cost"/></td>
</tr>
</t>
</t>
<t t-else="">
<center><h5>You need to save order line</h5></center>
</t>
</table>
</tbody>
</table>
</div>
</t>
</template>
Create Info Button
<?xml version="1.0" encoding="utf-8"?>
<odoo>
<record model="ir.ui.view" id="view_purchase_form_i_button">
<field name="name">purchase.form.inherit</field>
<field name="model">purchase.order</field>
<field name="inherit_id" ref="purchase.purchase_order_form"/>
<field name="arch" type="xml">
<xpath expr="//field[@name='order_line']/tree/field[@name='product_id']" position="after">
<widget name="last_purchase_widget" width="20px"/>
</xpath>
</field>
</record>
</odoo>


0